
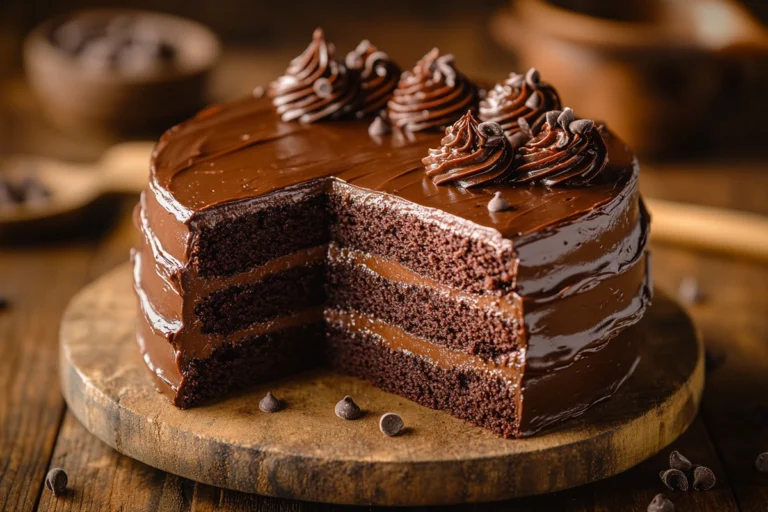
When you think about the ultimate dessert indulgence, a slice of rich, moist chocolate cake often comes to mind. In many families, the aroma of a freshly baked cake signifies celebration, comfort, and pure joy. Whether it’s a birthday gathering, a dinner party, or just a cozy weekend treat, chocolate cake has the power to bring people together.
Despite its universal appeal, getting a chocolate cake “just right” can sometimes feel daunting. You might find yourself struggling with cakes that turn out dry, dense, or lacking that luxurious chocolate flavor. Maybe your frosting doesn’t hold up or your layers don’t seem evenly baked. Trust me, you’re not alone in experiencing these hurdles. Plenty of baking enthusiasts—even seasoned pros—occasionally run into issues while preparing this classic dessert.
In this comprehensive guide, we’ll walk through all the details you need to bake the perfect chocolate cake. From choosing your ingredients carefully to mastering the baking technique, each section is packed with tips, tricks, and best practices. By the end, you’ll be confident in your ability to whip up a chocolate cake that rivals those from any high-end bakery.
Essential Ingredients and Possible Substitutions of Perfect Chocolate Cake
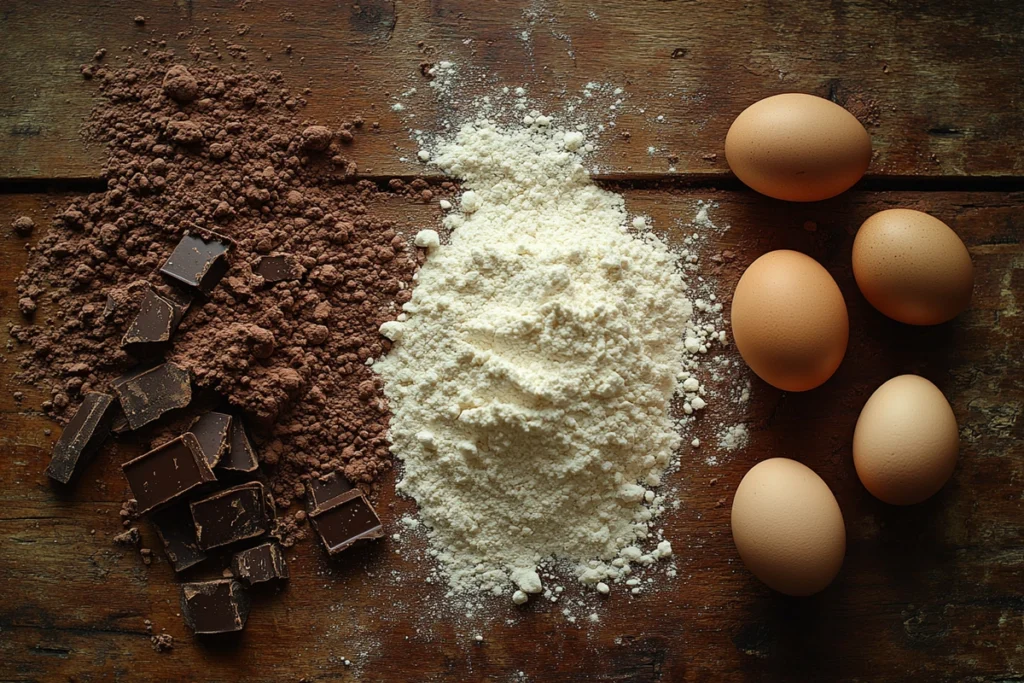
Building a great chocolate cake starts with thoughtful ingredient selection. Below is a breakdown of key ingredients, along with suggested substitutes:
1. Flour
- All-Purpose Flour: A versatile choice that provides a balanced structure.
- Substitute: You can use cake flour for a lighter texture, but make sure to adjust measurements (for every cup of all-purpose flour, use 1 cup plus 2 tablespoons of cake flour).
2. Cocoa Powder
- Unsweetened Cocoa Powder: Opt for high-quality cocoa for the best flavor. Dutch-processed cocoa powder works well if you prefer a smoother, less acidic taste.
- Substitute: If you only have natural cocoa powder, that’s fine—just be aware it might yield a slightly different color and tang.
3. Sugar
- Granulated Sugar: Essential for sweetness and moisture.
- Substitute: A mix of white sugar and brown sugar can add depth, but brown sugar alone might make the cake too moist and affect texture.
4. Eggs
- Large Eggs: They bind the batter and provide richness.
- Substitute: For an egg-free version, use a “flax egg” (1 tablespoon ground flaxseed + 3 tablespoons water, left to sit for 5 minutes) or applesauce. Note that these changes might alter the cake’s rise and texture.
5. Oil
- Vegetable or Canola Oil: This helps in maintaining moisture without overpowering the chocolate flavor.
- Substitute: Melted coconut oil or melted butter can be used, though you might notice a slight difference in flavor and texture.
6. Liquid Component
- Buttermilk: Contributes tanginess and tenderness.
- Substitute: If you don’t have buttermilk on hand, you can make a quick version by adding 1 tablespoon of vinegar or lemon juice to 1 cup of milk. Let it sit for about 5 minutes.
7. Leavening Agents
- Baking Powder and Baking Soda: Critical for a light, airy crumb.
- Important Note: Make sure these agents are fresh. Expired baking powder or soda can result in a flat cake.
8. Coffee or Hot Water
- Brewed Coffee: Enhances the chocolate flavor without making the cake taste like coffee.
- Substitute: Plain hot water works fine, though the flavor might not be as pronounced.
9. Salt
- Kosher Salt or Sea Salt: Balances sweetness and deepens cocoa flavor.
- Substitute: Table salt works, but use a bit less if substituting for kosher salt.
By having a clear understanding of each ingredient’s role, you’ll be able to adjust if you’re missing something at home. Just remember that deviating too much from the recommended list may affect the cake’s overall result.
Step-by-Step Instructions of the Perfect Chocolate Cake
Ready to bake? Gather your ingredients, preheat your oven, and roll up your sleeves. Here’s a detailed walk-through to ensure your chocolate cake comes out picture-perfect.
1: Prep Your Equipment and Preheat
- Preheat your oven to 350°F (175°C).
- Grease and line two 9-inch round cake pans with parchment paper. Proper lining prevents the cake from sticking and makes for a clean release.
2: Combine Dry Ingredients
- Sift or Whisk: In a large mixing bowl, sift or whisk together 2 cups of all-purpose flour, ¾ cup of unsweetened cocoa powder, 1½ teaspoons of baking powder, 1½ teaspoons of baking soda, and 1 teaspoon of salt.
- Set Aside: Ensuring these ingredients are well-combined helps create a uniform batter and prevents clumps.
3: Mix Wet Ingredients
- Eggs and Sugar: In another bowl, beat 2 large eggs and 1¾ cups of granulated sugar until slightly thick and pale. You can use a hand mixer or stand mixer.
- Add Oil and Buttermilk: Slowly incorporate ½ cup of vegetable oil (or melted butter) and 1 cup of buttermilk, mixing thoroughly.
- Combine: Make sure the mixture is uniform before moving on.
4: Incorporate the Dry Mixture
- Gradual Addition: With your mixer on low speed, add the dry ingredients to the wet mixture in small batches. Avoid dumping them in all at once to prevent lumps and overmixing.
- Scrape Down: Occasionally pause to scrape down the sides of the bowl with a spatula.
5: Add Coffee or Hot Water
- Brewed Coffee: Gently mix in 1 cup of hot brewed coffee. If you don’t have coffee, use plain hot water.
- Be Patient: The batter will appear thin; that’s perfectly normal. The liquid helps create a moist, tender crumb.
6: Fill the Pans
- Divide Batter: Evenly pour the batter into your prepared cake pans. Use a scale or measuring cups for the most accuracy.
- Tap Out Air: Lightly tap the pans on your countertop to release any trapped air bubbles.
7: Bake
- Oven Time: Place the pans on the middle rack of your preheated oven. Bake for 25-30 minutes, or until a toothpick inserted into the center comes out clean.
- Check Early: Ovens vary, so start checking around 20-22 minutes to avoid overbaking.
8: Cool
- Initial Cooling: Let the cakes rest in their pans for about 10 minutes.
- Remove from Pans: Carefully invert the pans onto a cooling rack. Peel off the parchment paper and allow the cakes to cool completely before frosting.
Following these steps precisely will help you avoid pitfalls like uneven layers or dry edges. Now that your cakes are cooling, let’s talk about frosting options and pro tips.
Serving Suggestions and Variations of the Perfect Chocolate Cake
Don’t be afraid to experiment with presentation and flavor twists. Here are a few ideas:
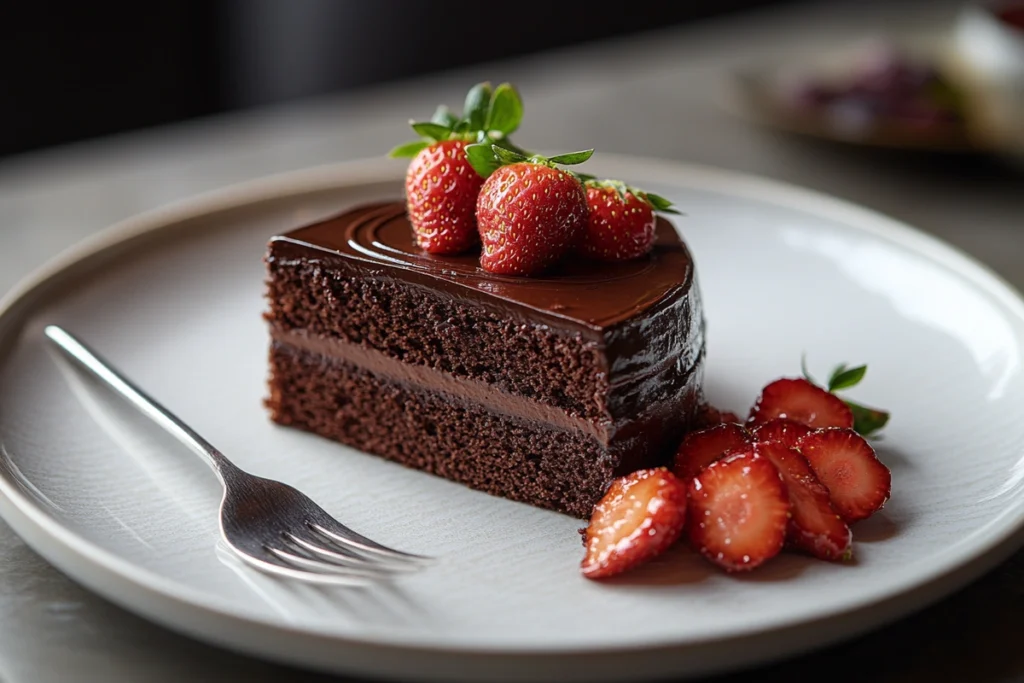
- Berry Boost: Top the cake with fresh berries like strawberries, raspberries, or blueberries for a pop of color and natural sweetness.
- Sprinkle Fun: If you’re making this cake for a birthday or a festive occasion, add colorful sprinkles on top of your frosting.
- Chocolate Shavings or Chips: Garnish the sides or top with shaved chocolate curls or mini chocolate chips for extra decadence.
- Layer of Fruit Preserves: Spread a thin layer of raspberry or cherry preserves between the cake layers before frosting. This adds a pleasant tangy contrast.
- Seasonal Flavors: For a holiday version, incorporate a hint of peppermint extract into your frosting or garnish with crushed candy canes. During fall, add a dash of cinnamon or nutmeg to the batter for a warming touch.
The beauty of chocolate cake is its versatility. With just a small tweak to the garnish or filling, you can transform your dessert to suit any mood or holiday theme.
Storage and Reheating Tips of the Perfect Chocolate Cake
Once you’ve made the perfect chocolate cake, you’ll want to keep it fresh. Proper storage not only prolongs its shelf life but also preserves flavor and texture.
- Room Temperature: If you plan to enjoy the cake within 2-3 days, store it in an airtight container at room temperature.
- Refrigeration: Cakes with perishable frostings, such as cream cheese or whipped cream, should be refrigerated in a sealed container. Bring the slices to room temperature before serving for the best taste.
- Freezing: Wrap unfrosted cake layers individually in plastic wrap, then place them in a freezer-safe bag or container. They can last up to 2 months. Thaw at room temperature or overnight in the fridge.
- Reheating: For a just-baked feel, microwave a slice for about 10 seconds on medium power. Be cautious not to overheat; you don’t want to dry it out.
Keeping these tips in mind ensures your cake remains as scrumptious on day three as it was on day one.
Frequently Asked Questions (FAQ)
Yes, you can substitute the all-purpose flour with a gluten-free all-purpose blend. Ensure the mix contains stabilizers like xanthan gum for structure. Remember, each brand varies, so check product-specific instructions.
Absolutely! Just keep an eye on the bake time—it may take about 30-35 minutes. Check doneness with a toothpick around the 25-minute mark.
You can, but you’ll lose some tanginess and tenderness. If possible, make your own buttermilk by adding a tablespoon of vinegar or lemon juice to a cup of milk and letting it sit for 5 minutes.
Make sure to measure ingredients correctly, especially flour. Also, using oil instead of butter tends to yield a more moist cake. Finally, avoid overbaking; check it early and often.
This usually happens due to underbaking or expired leavening agents. Always test your cake with a toothpick before pulling it out of the oven. Also, ensure your baking powder and soda are fresh.
Conclusion
A homemade chocolate cake is more than just a dessert—it’s often the centerpiece of life’s sweetest celebrations. With a balanced recipe, fresh ingredients, and a few baking tricks, you can create a luscious, tender, and memorably rich cake. By understanding each component—from the flour and cocoa to the technique and timing—you’ll cultivate the confidence needed to bake like a pro.
Whether you decide to top it with a luxurious chocolate buttercream or keep it simple with a dusting of powdered sugar, this cake is poised to become your go-to recipe for every occasion. Next time you’re craving something sweet, remember that the perfect chocolate cake is just a few steps away in your own kitchen.